

自制操作系统(21):rtl8139网卡驱动(下)- 中断处理与ARP支持
我们先接着写驱动来实现一个获取MAC地址的函数。
获取MAC地址
获取MAC地址也是读取网卡驱动的某个寄存器。RTL8139 的 MAC 地址存储在 I/O 端口偏移 0x00 ~ 0x05 处,直接逐字节读取就行:
static void get_mac(uint8_t mac[6]) {
    for (int i = 0; i < 6; ++i)
        mac[i] = inb(io_addr + i);
}
我这里还多做了一步,把这个网卡的mac也包了起来:
static int nic_mac_read(char* buffer, uint32_t /* offset */, uint32_t size) {
    uint8_t mac[6];
    get_mac(mac);
    for (int i = 0; i < size; ++i) {
        if (i >= 6) return 6;
        buffer[i] = mac[i];
    }
    return size;
}

static int nic_mac_write(const char*, uint32_t) { return -1; } // 不支持写MAC

void init_nic_dev_file(mounting_point* mp) {
    static dev_operation nic_opr;
    nic_opr.read = &nic_read;
    nic_opr.write = &nic_write;
    register_in_devfs(mp, "nic", &nic_opr);

    static dev_operation nic_mac_opr;
    nic_mac_opr.read = &nic_mac_read;
    nic_mac_opr.write = &nic_mac_write;
    register_in_devfs(mp, "nic_mac", &nic_mac_opr);
};
我们回到发送以太帧的地方,读取我们的设备文件获取mac,填入以太帧的目标mac字段:
...
    int nic_mac_fd = v_open(cur_pcb, "/dev/nic_mac", O_RDONLY);
    if (nic_mac_fd == -1) {
        printf("failed to open NIC dev!\n");
    }

    uint8_t mac[6];
    if (v_read(cur_pcb, nic_mac_fd, reinterpret_cast<char*>(mac), 6)) {
        printf("mac: %X:%X:%X:%X:%X:%X\n", mac[0], mac[1], mac[2], mac[3], mac[4], mac[5]);
    }

    char* buf = (char*)kmalloc(1024 * sizeof(char));
    memset(buf, 0xFF, 6); // 目标mac地址,FF:FF:FF:FF:FF:FF 表示广播
    memcpy(buf + 6, mac, 6);
    buf[12] = 0x88; // 0x88B5(IEEE保留的本地实验用途类型)
    buf[13] = 0xB5;
    memset(buf + 14, 0, 45);
    strcpy(buf + 14, "Hello world from LoliOS!");
    if ((v_write(cur_pcb, nic_fd, buf, 60)) != -1) { // 最小的以太帧长为60字节
        printf("/dev/nic do v_write successfully!\n");
    } else {
        printf("failed to write to /dev/nic!\n");
    }
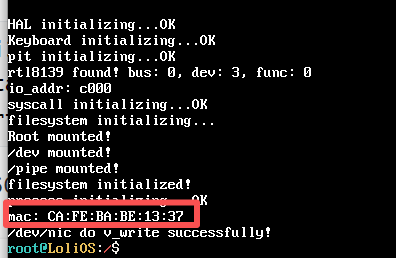
之后我们在qemu启动时给我们的网卡配置一个MAC地址:
qemu-system-i386 -cdrom lolios.iso \
    -netdev tap,id=net0,ifname=tap0,script=no,downscript=no \
    -device rtl8139,netdev=net0,mac=CA:FE:BA:BE:13:37
启动,就能看到我们配置的MAC地址输出在控制台了:
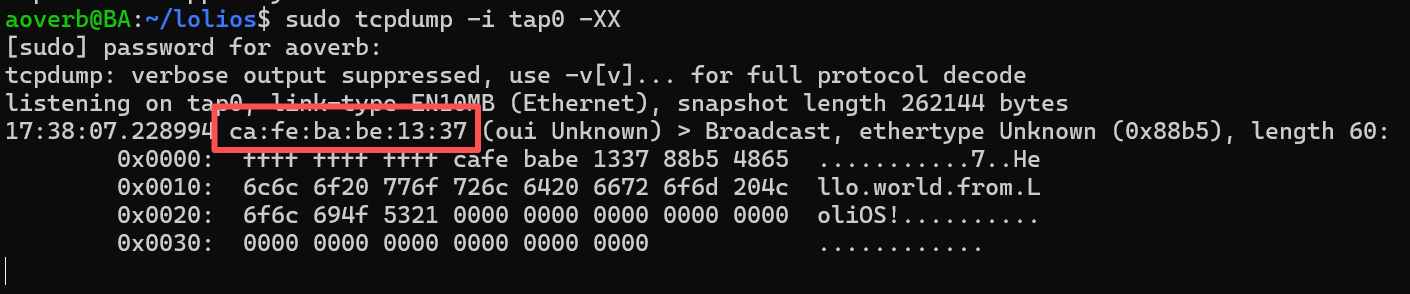
tcpdump也能看到。
“一个糟糕的点子”
还记得我在上一章说过,我们把NIC虚拟成一个文件是个糟糕的点子吗?这是因为在当时,我还沉浸在完成了简单的文件系统的余韵之中,有些转不过弯来,所以当我踏进网络栈时,我的想法没有从读文件的思路转过来。
其实我们的写没什么问题,我一直有点隐隐约约地觉得,“读取NIC的接收缓冲区”是个坏点子,但是具体说是什么不对劲呢?我首先想到的,其实是安全问题:因为首先,我们可以看到任何一个帧,其次,我们的读是有代价的,会让原本想读这个东西的人读不到了(因为缓冲区的指针已经偏移过去了!)。那是我还没去看ARP是什么的时候。(ARP下面会介绍,你可以理解为这是某个具体的,会用到读以太帧功能的组件)
当我看了ARP,想去实现它的时候,我发现我得先写一个读并解析以太帧的逻辑,那我就在以太帧的代码实现呗,但是这个时候,我陷入了一个具体的困境:首先,我不知道网卡什么时候能读到东西,什么时候读不到,这就意味着,我只能用一个while语句去轮询;其次,我只有读了才可能发现这个东西不是我想要的,于是我还得接着等待,更糟糕的是,别人要遭殃了,我把别人的东西读掉了:如果他也用轮询,他永远等不到想要的东西!逐渐的,我恍然大悟:我不知不觉中,把读网络数据与读文件等量齐观了。
文件是静止确定的,文件是不变的,就像你家楼下的便利点,他总是在那,所以我们去“拉取”,这没有问题;而现在我像在马路上等狂奔的快递车,等一辆有我的快递的快递车,我是只要看到快递车就拦下来,马上把上面的那个快递签收掉,发现里面不是我想要的东西就继续等,麻烦不说,还把别人的快递给丢了,害的别人永远收不到他们的快递!
所以我们要转变思路,面对瞬息万变的网络“快递”,我们应该做的是:设计成快递到了,就由分拣站给直接送到我们手上签收,这就没问题了。
上面和下面,就是拉模型和推模型的区别。其实网络栈的每一层都是这样,注册和推送,NIC是可以设置中断处理程序的,我们可以在里面写逻辑,把包推给以太帧处理程序,以太帧处理程序解析完后,看看这个帧是属于哪个协议的,就又推给指定协议的处理程序…
这是我踩过的一个坑,分享给大家,理解了上面的这些点后,我们的补救措施其实就很简单,我们看怎么给rtl8139指定中断处理程序。
中断处理程序

By Vijay Kumar Vijaykumar - Own work, Public Domain, https://commons.wikimedia.org/w/index.php?curid=3181779
我们继续看回这张图,我们要做的是把interrupt line的内容读出来,这里面是IRQ的号码,我们用它配合我们的中断处理函数注册中断就好了:
void rtl8139_interrupt_handler(registers*) {
    // 读取,推送
}

void reg_isr() {
    uint8_t irq = read_pci_by_32bits(pci_bus, pci_dev, pci_func, 15) & 0xFF;
    register_interrupt_handler(irq, rtl8139_interrupt_handler);
}
注册就这么简单,别忘了在驱动的初始化函数的最后调用reg_isr()。
static char recv_buff[1800];
void ethernet_handler(char* buffer, uint16_t size);

void rtl8139_interrupt_handler(registers*) {
    uint16_t status = inw(io_addr + REG_ISR);

    if (status & 0x0001) { // 收到了包
        while (!(inb(io_addr + REG_CHIPCMD) & 0x01)) {  // 缓冲区不为空
            int len = nic_read(recv_buff, 0, sizeof(recv_buff));
            if (len > 0)
                ethernet_handler(recv_buff, len);
        }
    }

    outw(io_addr + REG_ISR, status);  // 写回清除
    return;
}
收到中断之后,如果两个中断挨得比较近可能会丢失一个,所以我们用一个循环来读取,确保把缓冲区取完。
就这样,我们rtl8139网卡驱动就已经基本完成了。我们下面来实现以太帧处理的逻辑,以实现ethernet_handler。
以太帧
以太网帧由目标MAC地址、源MAC地址、帧类型、载荷构成。这些上一篇已经大概介绍给
我们先实现一个发以太帧的函数:
#include <kernel/net/ethernet.hpp>
#include <driver/rtl8139.hpp>
#include <kernel/mm.hpp>
#include <string.h>

typedef struct {
    char target_mac[6];
    char source_mac[6];
    char type[2];
} __attribute__((packed)) ethernet_head;

int send_ethernet_frame(char target_mac[6], char source_mac[6], char type[2],
    char* buffer, uint16_t size) {
    if (size > 1536 - sizeof(ethernet_head)) return -1;
    void* buf = kmalloc(sizeof(ethernet_head) + size);
    ethernet_head* head = (ethernet_head*)buf;
    memcpy(head->target_mac, target_mac, 6);
    memcpy(head->source_mac, source_mac, 6);
    memcpy(head->type, type, 2);
    memcpy(buf + sizeof(ethernet_head), buffer, size);
    return nic_write((const char*)buf, sizeof(ethernet_head) + size);
}
发嘛,基本上就是根据传入的参数来做包装然后调用下层函数发出去。但是这里有个坑:这样每一层封装岂不是都得kmalloc,用完又马上释放?时间和内存开销都不小。所以最好是一开始就预留好头部空间,下面逐渐按照头部指针填即可,这个我们后面再做。
ethernet_handler的实现其实也很简单:用ethernet_head来解头部,根据头部的类型,来调用对应的网络层协议处理函数,比如IP、ICMP,还有我们要做的ARP。
void arp_handler(char* buffer, uint16_t size);

void ethernet_handler(char* buffer, uint16_t size) {
    if (size < 60) return;
    char* type = reinterpret_cast<ethernet_head*>(buffer)->type;
    // 注意网络传输用的是大端,但是这里我们逐个字节判断,没问题
    if (type[0] == 0x08 && type[1] == 0x06) { // ARP
        arp_handler(buffer + sizeof(ethernet_head), size - sizeof(ethernet_head));
    }
    return;
}
我们依旧把arp_handler留给后面实现。
ARP
终于来到我们的主线任务了:发送一个ARP请求,然后尝试接收响应。
ARP介绍
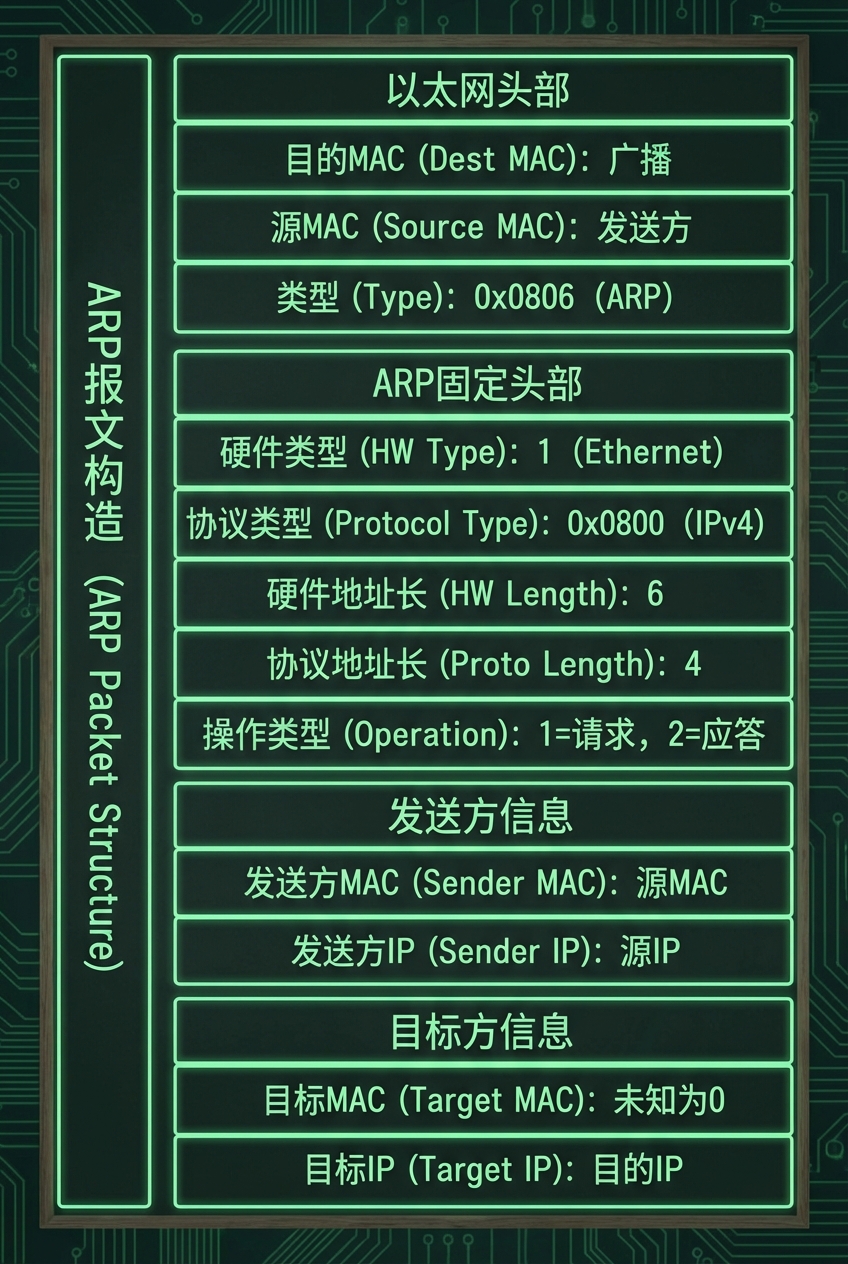
ARP(地址解析协议)用于发现协议地址(如IP地址)对应的硬件地址(如MAC地址),发送ARP请求会向网络中的所有设备广播ARP请求,内容是“我是XX协议下地址为XX,XX类硬件下地址为XX的设备,我在寻找同一协议同一硬件下协议地址为XX的设备的硬件地址”,当对应的硬件接收到请求时,就会发送一条响应到请求发送的硬件地址,告知自己的硬件地址。
我们先看下ARP报文的构造:
然后我们来结合场景写出处理各种场景的代码:
1.我要问别人MAC
问别人mac的场景,其实就是发送一个arp报文:
typedef struct {
    uint16_t hw_type;       // 硬件类型,以太网 = 0x0001
    uint16_t proto_type;    // 协议类型,IPv4 = 0x0800
    uint8_t  hw_len;        // 硬件地址长度,6
    uint8_t  proto_len;     // 协议地址长度,4
    uint16_t opcode;        // 1 = request 2 = reply
    uint8_t  sender_mac[6];
    uint8_t  sender_ip[4];
    uint8_t  target_mac[6];
    uint8_t  target_ip[4];
} __attribute__((packed)) arp_packet;
除了后面两个字段,前面都是固定的,target_mac我们不知道可以全填0,target_ip就填我们要查的ip对应的mac:
const uint8_t broadcast_mac[] = {
    0xff, 0xff, 0xff, 0xff, 0xff, 0xff
};

int send_arp(uint16_t opcode, uint8_t* target_mac, uint8_t* target_ip) {
    arp_packet header;
    header.hw_type = htons(0x0001);
    header.proto_type = htons(0x0800);
    header.hw_len = 6;
    header.proto_len = 4;
    header.opcode = opcode;
    memcpy(header.sender_mac, my_mac(), 6);
    memcpy(header.sender_ip, my_ip, 4);
    memcpy(header.target_mac, target_mac, 6);
    memcpy(header.target_ip, target_ip, 4);
    // 以太帧目标:request 用广播,reply 用对方 MAC
    uint8_t* eth_dst = (opcode == htons(APR_OPCODE_REQ))
        ? (uint8_t*)broadcast_mac
        : target_mac;
    return send_ethernet_frame(eth_dst, my_mac(), TYPE_ARP, &header, sizeof(header));
}
我们可以把它包装成一个函数:send_arp。
先来看看里面的实现,用到的htons函数可以提一下,它是把主机端用的字节序(小端),换成网络数据用的字节序(大端)。
以及,我们先给自己设置一个固定的IP,后面可以实现自动获取:
const uint8_t my_ip[] = {
    10, 0, 1, 1
};
调用send_arp之后,如果找到了对应的主机,它就会给我们发送一个reply,这个属于我们要处理的第二个场景:别人给我回复MAC。
2.别人给我回复MAC
来自外部的ARP包最终会触发我们的arp_handler,我们需要做一些初步的过滤:
void arp_handler(char* buffer, uint16_t size) {
    arp_packet* header = reinterpret_cast<arp_packet*>(buffer);
    // 仅接受<ip, 以太网>的映射
    if (header->hw_type != htons(0x0001) || header->proto_type != htons(0x0800)) return;
而别人给我回复MAC,我则需要把ip->mac映射记录到我的数据结构里:
void arp_handler(char* buffer, uint16_t size) {
    arp_packet* header = reinterpret_cast<arp_packet*>(buffer);
    // 仅接受<ip, 以太网>的映射
    if (header->hw_type != htons(0x0001) || header->proto_type != htons(0x0800)) return;
    if (header->opcode == htons(APR_OPCODE_REQ)) { // 请求
        if (is_same_ip(my_ip, header->target_ip)) { // 场景3:别人问mac,如果目标ip就是我
                send_arp(htons(APR_OPCODE_REPLY), header->sender_mac, header->sender_ip); // 我来响应
            }
    } else if (header->opcode == htons(APR_OPCODE_REPLY) && is_same_mac(my_mac(), header->target_mac)) {
        // 场景2:别人给我回复它的MAC
        arp_table_insert(header->sender_ip, header->sender_mac);
    }
}
这里我用的是哈希表:
#include <unordered_map>

std::unordered_map<uint32_t, uint64_t> ip_to_mac;

bool arp_table_lookup(uint8_t* ip, uint8_t* mac) {
    uint32_t t_ip = 0;
    for (int i = 0; i < 4; ++i) {
        t_ip = (t_ip << 8) + ip[4 - i - 1];
    }
    if (ip_to_mac.find(t_ip) == ip_to_mac.end()) return false;
    uint64_t t_mac = ip_to_mac[t_ip];
    for (int i = 0; i < 6; ++i) {
        mac[6 - i - 1] = t_mac & 0xff;
        t_mac >>= 8;
    }
    return true;
}

void arp_table_insert(uint8_t* ip, uint8_t* mac) {
    uint32_t t_ip = 0;
    for (int i = 0; i < 4; ++i) {
        t_ip = (t_ip << 8) + ip[4 - i - 1];
    }
    uint64_t t_mac = 0;
    for (int i = 0; i < 6; ++i) {
        t_mac = (t_mac << 8) + mac[6 - i - 1];
    }
    ip_to_mac[t_ip] = t_mac;
}
这样后面就可以用arp_table_lookup去查出ip对应的mac地址了,只不过还得再把得到的结果再自行转换。
3.别人问我MAC
其实在上面的代码已有呈现:
    if (header->opcode == htons(APR_OPCODE_REQ)) { // 请求
        if (is_same_ip(my_ip, header->target_ip)) { // 场景3:别人问mac,如果目标ip就是我
                send_arp(htons(APR_OPCODE_REPLY), header->sender_mac, header->sender_ip); // 我来响应
            }
测试
我们来测试一下查询MAC的场景,不过首先,我们要给我们的宿主机在我们的tap上面分配一个ip:
sudo ip addr add 10.0.1.0/24 dev tap0

再准备一些函数:
void to_print_mac(uint8_t* ip) {
    printf("sending arp request...\n");
    send_arp(htons(APR_OPCODE_REQ), broadcast_mac, ip);
}
打印返回的新表项:
void arp_table_insert(uint8_t* ip, uint8_t* mac) {
uint32_t t_ip = 0;
for (int i = 0; i < 4; ++i) {
t_ip = (t_ip << 8) + ip[4 - i - 1];
}
uint64_t t_mac = 0;
for (int i = 0; i < 6; ++i) {
t_mac = (t_mac << 8) + mac[6 - i - 1];
}
ip_to_mac[t_ip] = t_mac;
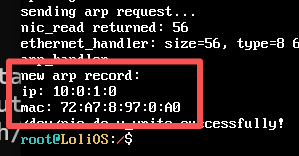
printf("new arp record:\n");
printf("ip: %d:%d:%d:%d\n", ip[0], ip[1], ip[2], ip[3]);
printf("mac: %X:%X:%X:%X:%X:%X\n", mac[0], mac[1], mac[2], mac[3], mac[4], mac[5]);
}
在kernel调用我们发送arp请求的函数:
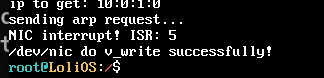
    uint8_t ip[4] = {10, 0, 1, 0};
    printf("ip to get: %d:%d:%d:%d\n", ip[0], ip[1], ip[2], ip[3]);
    to_print_mac(ip);

运行,没有返回记录…为什么?
原来是:1、我之前设置过PIC从片偏移,注册中断函数时忘了把这个算进去了;2、从片PIC没有打开。
void reg_isr() {
    // 读取网卡的中断号
    uint8_t irq = read_pci_by_32bits(pci_bus, pci_dev, pci_func, 15) & 0xFF;
    register_interrupt_handler(irq + 0x20, rtl8139_interrupt_handler); // 加上从片偏移 减去在主片的7个设备

    hal_enable_irq(2);   // 打开从片
    hal_enable_irq(irq); // 打开IRQ 11 本身

    // 开启接收OK和接收错误的中断
    outw(io_addr + REG_IMR, 0x0001 | 0x0004);  // ROK | RXErr
}
现在能响应中断了,但是还是没有打印MAC。一路向上追:

tcpdump看到我们的请求是发送成功了的。
void ethernet_handler(char* buffer, uint16_t size) {
    if (size < sizeof(ethernet_head)) return;
    char* type = reinterpret_cast<ethernet_head*>(buffer)->type;
    // 注意网络传输用的是大端,但是这里我们逐个字节判断,没问题
    if (type[0] == 0x08 && type[1] == 0x06) { // ARP
        arp_handler(buffer + sizeof(ethernet_head), size - sizeof(ethernet_head));
    }
    return;
}
后面把这个最小以太网帧阈值改小了就能收到了。
但是还是会偶尔收不到:
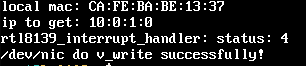
中断是有的,但是缓冲区为空。
    if (irq + 0x20 >= 0x28) {
        outb(0xA0, 0x20);  // slave EOI
    }
    outb(0x20, 0x20);      // master EOI
问了下Claude,恍然大悟,原来是在我的中断处理程序里面,没标记中断处理结束!这样就不会给我们发下一个中断了,我们有时候会先收到一个传输成功的中断,然后后面通知我们缓冲区有内容的中断就发不过来了。
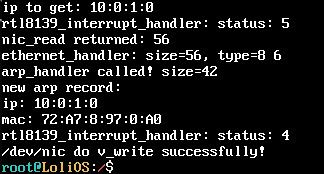
现在正常了。
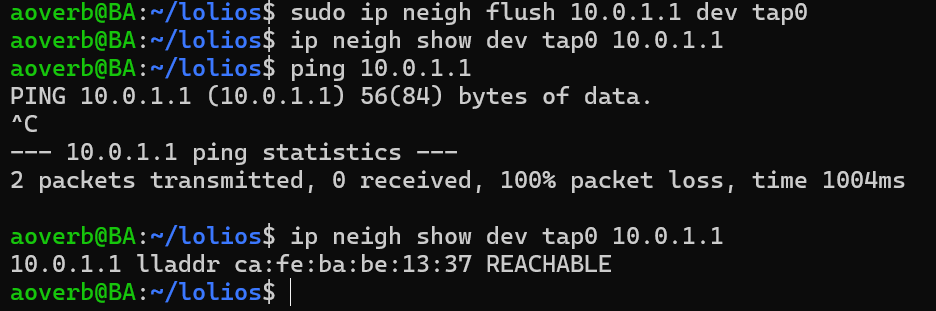
并且经过测试,我们的系统也能正确响应ARP请求噢。鼓掌👏!
总结
我们实现了ARP的支持,下一节我们将实现IP和ICMP协议的支持,并来看看怎么让我们的系统可以实现ping和响应ping!
参与讨论
(Participate in the discussion)
参与讨论
没有发现评论
暂无评论